Step 1
Prepare gluing
Clean the adhesive surface with an alcohol wipe and test the adhesive effect using the enclosed TEST adhesive. If it does not hold, clean further, see our Q&A.
The following are the essential steps for installing your new phone holder. We will start with installing the holder itself and then use our cable management kit to give your cockpit a clean look.
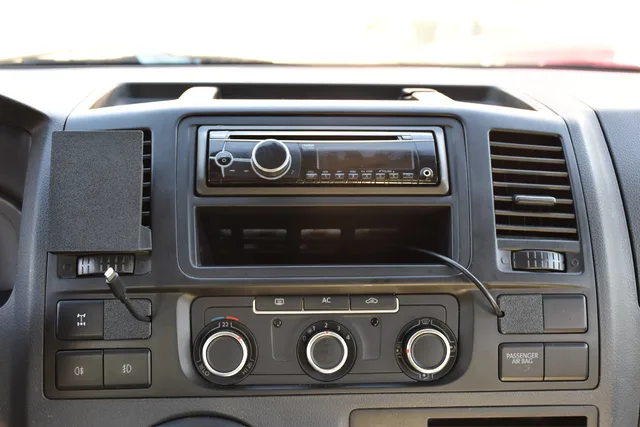
These instructions apply to the T5.2 with the narrow console.
Step 1
Clean the adhesive surface with an alcohol wipe and test the adhesive effect using the enclosed TEST adhesive. If it does not hold, clean further, see our Q&A.
Step 2
Now remove the red protective film from the adhesive on the holder.
Step 3
Insert the charging cable into the holder as shown in the illustration.
Step 4
Position the holder as shown in the illustration and secure it by applying pressure.
Step 1
Clean the adhesive area with the cleaning cloth, wait one minute before continuing.
Step 2
Place the cable in the position shown in the illustration and plug it into the USB socket.
Step 3
Remove the red protective film from the adhesive tape on the cable guide.
Step 4
Install the cable guide at the marked position.
Frequently asked questions can be found in my Q&A, for all other questions please contact us by email info@beevention.com.
Thanks for your feedback!
Often it is the camera frame of the case. If it is larger than the camera itself, it reaches onto the holder's magnet. The phone then does not lie flat: it holds less firmly and the MagCharge does not charge.
Our magnet has the full size of the MagSafe ring, with less than 1 mm of edge. That way your phone holds perfectly while driving. It needs a case with a slim camera frame that does not reach into the magnet circle.
Quick test: put the phone on without its case. If it holds and charges, the case is the cause.
Tighten the two central adjustment screws slightly. This makes it harder for the cheeks to move and the adjustment is easier.
Make sure that all six screws are loosened.
You can finely adjust the pressure on the cheeks with the two centre adjustment screws.
Some cleaning and cockpit sprays contain silicone, which prevents adhesion.
Use a special degreasing silicone cleaner and repeat the application several times until the bonding works on this surface.
No problem! We offer spare parts such as cables, adhesives and other components separately.
Just send us an e-mail to info@beevention.com.
VW often uses charging sockets with low charging power. Use the cigarette lighter with a suitable adapter instead.
Attention: The cigarette lighter does not switch off automatically when the car is switched off. It is best to pull out the plug after use to avoid a flat battery.
We are happy to help – just drop us a line.
Nothing found. Try the model or the manufacturer.